
How to detail your self-drafted patterns
- Ali Morris

- Sep 12, 2025
- 4 min read
Updated: Dec 8, 2025
When you buy a commercial pattern it's covered in all sorts of markings and symbols.
But when you're making your own, do you need to do all of these?
What symbols should you use, and which are essential?

A finished pattern might look something like this, with arrows marking the grainline, notches for matching up panels, and cutting and sewing lines. But do you really need all of these?
If you're looking to sell them, then it's essential to stick to the standard markings so everyone can understand them, however, if they're just for personal use you really can use whichever symbols makes sense to you.
What I will say though, is just make sure it'll still make sense if you get the pattern back out in a couple of years, make sure there's enough detail to be really clear, i.e. state the size of the seam allowance if it has one, label each piece clearly, mark darts and notches etc.
So let's go through the standard symbols and lines one at a time.

You'll start making your pattern by drafting it with the actual seam lines, and any darts. You can either leave this as your only line if you plan to add the seam allowance when you cut out your fabric, or you can add the seam allowance to the pattern.
Either way, just make sure it's very clear if your pattern has a seam allowance or not, and what size it is. A good way to do this is to have a solid line for cutting and dashed line for sewing, but you can also just use solid lines for all. Another way is to use different colours, although I'd always advise drafting a pattern with a regular lead pencil.

It might seem really obvious which piece is which, but it's good practice to label all your pieces. For example Centre Front or CF, Side Back or SB etc...
I'd recommend keeping all the pieces together in an envelope, but it's still good to write on them the name of the garment / project in case any of your pattern pieces get muddled up with another pattern.

The grainline is really important. It might seem obvious when you're drafting, but it's just good practice to draw on your patterns. The standard way to do this is with a double ended arrow that runs from top to bottom. This is even more essential if you don't use dot and cross paper. A pattern piece like in my example is pretty obvious, but more unusual shaped pattern pieces won't be.
If you're making a pattern to be used on the bias this will be a diagonal line.

Make sure you write down how many pieces need to be cut out, and whether they're identical, mirrored (a matching pair) or cut on the fold.
The standard way to indicate that something is to be cut on the fold (fold the fabric over and line this up with the edge of the pattern) is to draw an arrow and label it like in the example above.

Notches are extremely important. It's often really obvious what matches up when you're drafting your pattern, but once pieces are cut out with a seam allowance it's not always obvious where pieces match up, particularly if you have a curve like on the pieces above. At first glance they look like they don't match with the seam allowance but they do.
If you don't use them you could risk pieces not being eased in correctly, and the seam won't sit well and it might affect the fit. This is particularly importamt on a sleeve head!
The above examples are symbols you can use for notches. I tend to use the top two as that's how I learnt, using a combination of a single and double notch makes it very clear which is which, for example on a sleeve head, I use a single notch on the front, and a double on the back, that way it's very clear which is which.
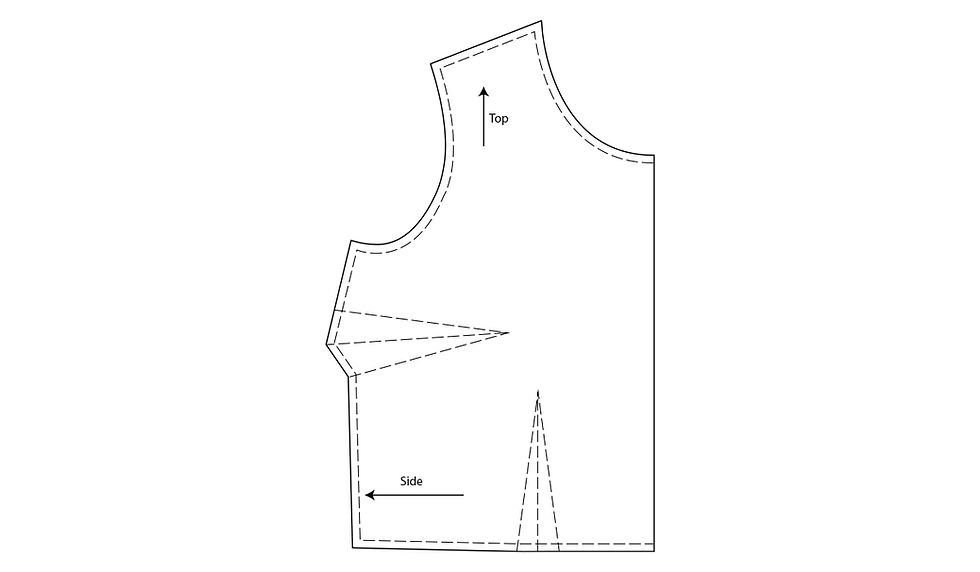
Marking which way is the top, or which direction points to the side (or you could point to the CF / CB) isn't a standard thing, but it's something I tend to do if a pattern piece isn't very obvious and could cause confusion. A time when you might want to do this is when making something with a lot of panels that look symetrical, or quite similar to each other. It just avoids any unneccessary confusion.

So that's all the basics, then you just need to think about the details.
The above example shows button (right) and buttonhole (left) markings. This is a pretty standard way of marking where they go. These line up with the centre front line.

There are various ways to mark pleats and gathers.
For pleats I tend to use lines to mark where the pleats fold, with arrows indicating what to fold where. On the above example the lines at either side join up when folded. There are various ways to fold pleats, so I'd advise finding a way to detail them that makes sense to you. I sometimes draw a little sketch of the finished pleat too.
For gathers I tend to mark with a line either side of where the gathers are, and write what size the section needs to be gathered to. If the whole seam is to be gathered, I'll just write the size the whole seam needs to be gathered to.
So I think that's all the basics, but I'd just say again, make sure it makes sense to you, and that it will still make sense if you get the pattern out to use a couple of years later.
When I make my patterns I always detail them as if I'm doing them for someone else, in case my memory completely fails me in the future, (which it often does!!!!)


Comments